

Almost everything I have learned about human hair wigs I’ve learned from Jason Archer. His book Wig Life is the definitive instructional resource every wig wearer should own.
Here’s why you need this book:
Why Wig Life by Jason Archer is Essential
Wig Life is the comprehensive guide that fills the knowledge gap most wig wearers face. Here’s why it’s invaluable:
Expert techniques from a professional – Jason Archer is a renowned wig specialist who works with clients daily. His methods are proven, practical, and based on years of hands-on experience.
Proper care extends wig lifespan – Learning correct washing, styling, and maintenance techniques can add months or even years to your wig’s life, saving you significant money over time.
Avoid costly mistakes – Many wig wearers unknowingly damage their pieces through improper handling, harsh products, or incorrect styling methods. This book helps you avoid those pitfalls from the start.
Troubleshooting guidance – When issues arise—tangling, shedding, lace damage, or styling challenges—you’ll have reliable solutions at your fingertips instead of guessing or relying on conflicting online advice.
Confidence in your investment – Premium human hair wigs are a significant investment. This manual ensures you know how to protect that investment and get the most natural, beautiful results.
Fills the void suppliers leave – Most wig suppliers provide minimal care instructions. Wig Life gives you the detailed, professional-level guidance you actually need to maintain your piece properly.
Purchase Jason’s book Here
Washing Your Wig
With everyday wear, most wigs require a complete wash roughly once every 15 to 20 wears—though this varies based on styling product usage and your local climate. No matter how careful we are, washing a wig is hard on the wig and therefore, it’s important not to overwash it.
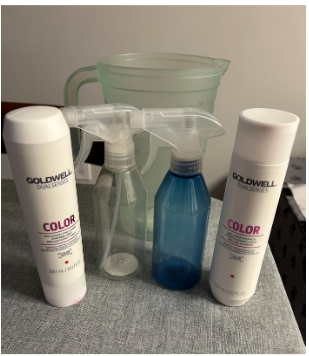
We suggest using a sulfate free color safe shampoo and conditioner. Do NOT use hot water or cold water but lukewarm water. These tips will help your hair color last as long as possible before needing a refresh. Additionally, do not use cheap products on your expensive investment. For washing, we suggest brands such as Redken and Kenra. You must pamper your hair if you want it to behave!
The routine below follows a gentle washing approach called the Pitcher Method from Jason Archer’s book Wig Life (used with permission). Using this method preserves your lace, reinforces the hair knots, and limits shedding over time. Always use a light touch—human hair wigs are fragile, particularly at the lace and knotted areas.
Why use this approach?
Step 1
Prepare & Cleanse
- Combine 2 tablespoons sulfate-free shampoo with ½ cup lukewarm water in a spray bottle. Shake thoroughly.
- Flip your wig inside out and place it flat on a clean towel.
- Apply the shampoo mixture liberally to both the hair and cap interior.
- Work the product gently through the inside of the cap, the hair, and along the hairline using your fingertips.
- Fill a small pitcher with lukewarm water. Grasp the wig at the crown and slowly pour water through the cap to remove shampoo. Repeat as needed until all product is gone.
- Press gently to remove excess water.
Step 2
Condition
- Turn the wig right-side out and transfer to a fresh towel.
- Mix 2 tablespoons conditioner with ½ cup cool water in a separate spray bottle and shake well.
- Apply the conditioner mixture from mid-length to ends only. Keep it away from the knots and cap base—conditioner can weaken knots and increase shedding.
- Allow to sit for 3–5 minutes. Flip the wig inside out once more and rinse with cool water from your pitcher, pouring gently through the cap until all product is removed.
- Pat dry with a towel (never twist or wring).
Step 3
Seal Knots & Dry the Cap
- After towel-drying, apply a light mist of knot sealer to the interior lace top to minimize future shedding. Use sparingly to avoid flaking.
- Blow-dry the wig's interior completely. This activates the knot sealer and prevents hair swelling that loosens knots.
Step 4
Detangle & Air Dry
- Spray a leave-in conditioner or detangler onto damp hair (mid-length to ends), then brush carefully with a wide-tooth comb or finger comb—begin at the tips and work upward.
- Set the wig on a mannequin head or collapsible stand and allow it to air dry overnight for optimal results.
Step 5
Finish with Hair Oil
- When completely dry, work 2-3 drops of oil through the mid-lengths and ends to add softness, shine, and prevent dryness. A little goes a long way—use 1 drop for shorter hair, 2 drops for mid length hair and 3 drops for long hair.. We suggest you purchase pure grapeseed oil or if available, Jason’s Archer’s Nectar J Hair oil.
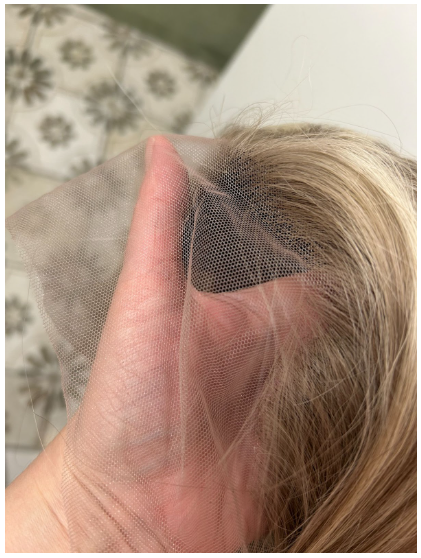
Protect Your Lace!
- When cutting the lace, leave at least ¼ inch as a buffer so you'll have extra material to work with as natural fraying occurs.
- Never pick up or hold your wig by the lace front.
- When fraying appears, trim only the minimal amount needed to remove the damaged area.
- Apply a lace preservation product like Fray Check, using just a small amount along the edges.
- Always use ball pins rather than T pins—T pins are larger and can puncture holes in the lace. Block your lace front when styling your wig or if it starts to lift.
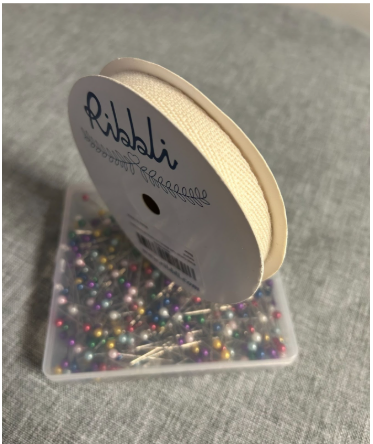
Blocking Your Lace Front Wig
- What You'll Need:
- Twill tape (approximately 1/2 inch wide)
- Ball pins
- Canvas block or wig head
- Water
Step 1
Prepare the wig
- Damped the twill tape. Run it under water then ring out any excess water.
Step 2
Position the wig
- Place your wig on a canvas block or wig head that matches your head size as closely as possible.
Step 3
Apply the twill tape
- Starting at one temple, pin one end of the twill tape to the canvas block using a ball pin. Lay the tape across the hairline of the lace, following the natural curve.
Step 4
Secure as you go
- Gently pull the tape taut (but not overly tight) and pin it down every 1-2 inches along the hairline. The tape should hold the lace flat against the block without stretching or distorting it.
Step 5
Complete the perimeter
- Continue pinning the twill tape all the way around the lace front, ending at the opposite temple.
Step 6
Let it dry completely
- Allow the twill tape to dry completely. Don't remove the tape until the lace is fully dry.
Step 7
Remove carefully
- Once dry, gently remove the pins and twill tape. The lace should now lay flatter and hold its shape better.
Tips:
- Repeat this process periodically to maintain the blocked shape
- Never use T pins directly on the lace—only ball pins
- The tape creates even pressure without damaging the delicate lace material